

Bevy 0.17
Posted on September 30, 2025 by Bevy Contributors

Thanks to 278 contributors, 1311 pull requests, community reviewers, and our generous donors, we're happy to announce the Bevy 0.17 release on crates.io!
For those who don't know, Bevy is a refreshingly simple data-driven game engine built in Rust. You can check out our Quick Start Guide to try it today. It's free and open source forever! You can grab the full source code on GitHub. Check out Bevy Assets for a collection of community-developed plugins, games, and learning resources.
To update an existing Bevy App or Plugin to Bevy 0.17, check out our 0.16 to 0.17 Migration Guide.
Since our last release a few months ago we've added a ton of new features, bug fixes, and quality of life tweaks, but here are some of the highlights:
- Bevy Solari - Raytraced Lighting (Experimental): Bevy now has work-in-progress support for stunning, physically realistic real-time lighting. Many limitations apply, but boy is it pretty.
- Improved Observers / Events: Observers have been wildly popular, offering users a flexible way to respond to events with very little boilerplate. We've cleaned up the Observer and Event APIs, made them even more flexible, and improved their documentation!
- Headless Bevy UI Widgets (Experimental): A new work-in-progress headless UI widget library, providing baseline widget functionality to build on top of.
- Bevy Feathers - Widgets for Tooling (Experimental): An opinionated set of tooling-focused widgets built on top of our headless widgets. We're still building this out, but you can play with it right now!
- Rust Hotpatching: Tired of waiting for Rust to recompile while prototyping? Bevy now has an initial integration of
subsecondby Dioxus, allowing you to opt into hotreloaded Rust code without restarting your program. This is currently limited to Bevy ECS systems, and has some limitations. - Light Textures: You can now use textures to artistically modulate the intensity of light.
- DLSS: On Nvidia RTX GPUs, Bevy now supports Deep Learning Super Sampling (DLSS) for anti-aliasing and upscaling.
- Tilemap Chunk Rendering: A new performant way to render tilemaps in chunks ... this is our first step in building out Bevy's built-in tilemap system.
- Web Assets: Bevy's asset system now supports loading assets from
httpandhttpsURLs. - Reflect Auto-Registration: When reflecting types, you no longer need to manually register them in your apps.
- Frame Time Graphs: A new built-in widget to debug frame times in running Bevy apps.
- UI Gradients: Bevy UI now supports background and border gradients.
- Raymarched Atmosphere: Bevy's procedural atmosphere now has a raymarching mode for more accurate lighting.
- Virtual Geometry BVH Culling: Bevy's virtual geometry system is now much faster thanks to BVH culling.
Bevy Solari: Raytraced Lighting (Experimental) #
With the new bevy_solari crate, we're making our first steps towards realtime raytraced lighting.
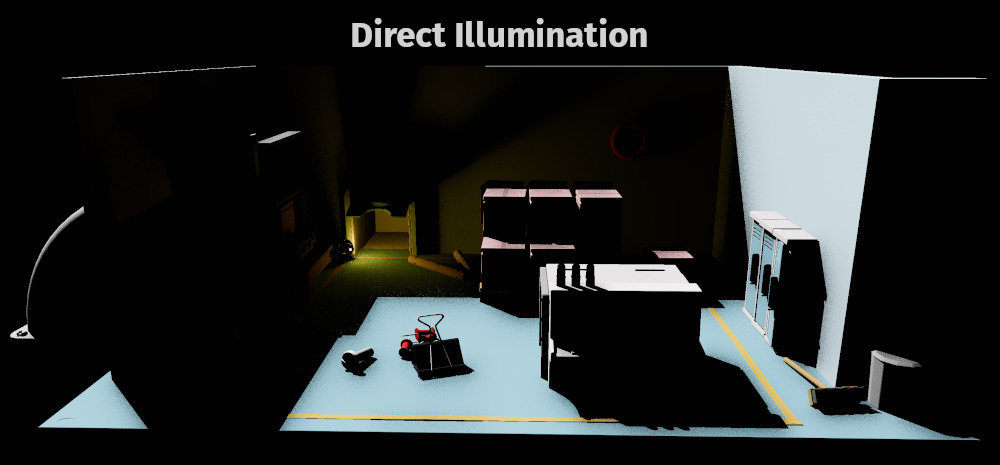
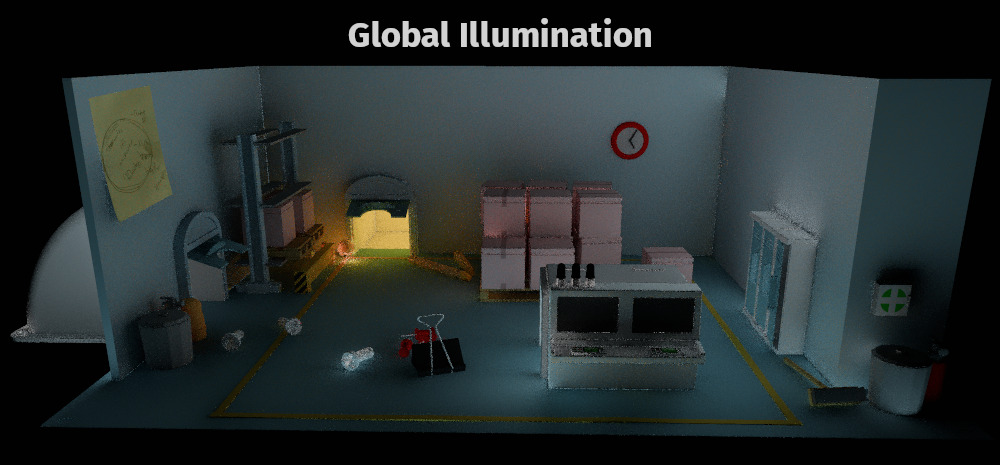
For some background, lighting in video games can be split into two parts: direct and indirect lighting.
Direct lighting is light that is emitted from a light source, bounces off of one surface, and then reaches the camera. Indirect lighting by contrast is light that bounces off of different surfaces many times before reaching the camera. Indirect lighting is also often called global illumination.
In Bevy, direct lighting comes from analytical light components (DirectionalLight, PointLight, SpotLight) and shadow maps. Indirect lighting comes from a hardcoded AmbientLight, baked lighting components (EnvironmentMapLight, IrradianceVolume, Lightmap), and screen-space calculations (ScreenSpaceAmbientOcclusion, ScreenSpaceReflections, specular_transmission, diffuse_transmission).
The problem with these methods is that they all have large downsides:
- Emissive meshes do not cast light onto other objects, either direct or indirect.
- Shadow maps are very expensive to render and consume a lot of memory, so you're limited to using only a few shadow casting lights. Good shadow quality can be difficult to obtain in large scenes.
- Baked lighting does not update in realtime as objects and lights move around and requires time to bake, slowing down game production.
- Screen-space methods have low quality and do not capture off-screen geometry and light.
Bevy Solari is intended as a completely alternate, high-end lighting solution for Bevy that uses GPU-accelerated raytracing to fix all of the above problems. Emissive meshes properly cast light and shadows, you can have hundreds of shadow casting lights, quality is much better, it requires no baking time, and it supports fully dynamic scenes!
Try it out #
While Bevy 0.17 adds the bevy_solari crate, it is not yet production ready.
However, feel free to run the solari example to check out the progress we've made. There are two different modes you can try out:
- A non-realtime "reference" mode that uses pathtracing:
cargo run --release --example solari --features bevy_solari -- --pathtracer. - A realtime mode that uses a combination of techniques, and currently supports only diffuse materials:
cargo run --release --example solari --features bevy_solari.
Additionally, if you have a NVIDIA GPU, you can enable DLSS Ray Reconstruction with the realtime mode for a combination of denoising (Bevy Solari does not currently come with any alternate denoisers), lower rendering times, and anti-aliasing: cargo run --release --example solari --features bevy_solari,dlss.
How it works #
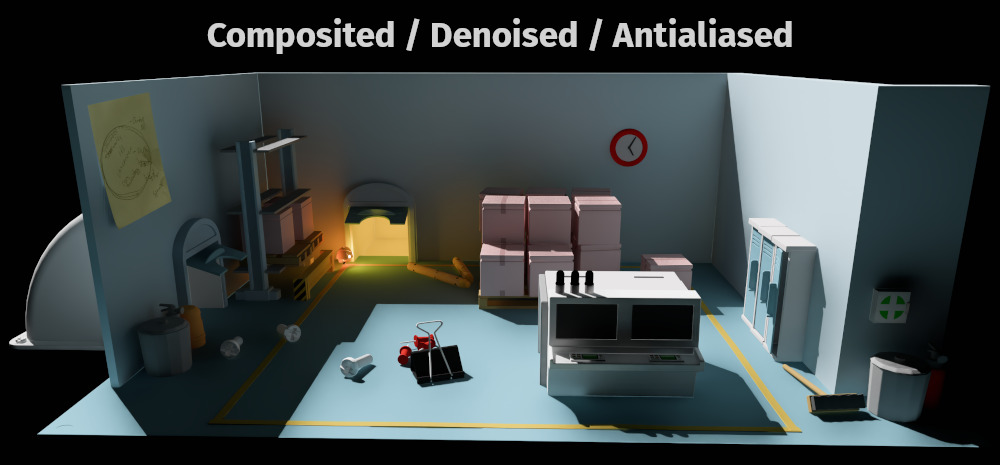
Our current implementation uses raytraced direct and indirect lighting (also known as global illuminance), which are sampled via ReSTIR DI/GI and uses a world-space irradiance cache to improve GI quality. Like all raytracing techniques, this produces results that are too noisy for realtime applications. To resolve this, you need to add a denoising step, which is currently handled via DLSS Ray Reconstruction, although we'd be happy to add support for alternate methods as well in the future.
If you're interested in the crunchy technical details of how this all works: please read @JMS55's blog post for a frame breakdown!
Look forward to more work on Bevy Solari in future releases!
Special thanks to @Vecvec for adding raytracing support to wgpu.
Event / Observer Overhaul #
Bevy's Observer API landed a few releases ago, and it has quickly become one of our most popular features. In Bevy 0.17 we rearchitected and refined the Event and Observer APIs to be clearer, easier to use, and more performant. We plan on rolling out Bevy's next generation Scene / UI system in the near future, and observers are a key piece! We wanted to ensure they were in a better place for the next phase of Bevy development. The old API had some problems:
- Concept names were confusing and ambiguous: Events could be "observed" by observers, "buffered" in
Eventscollections, or both. Knowing how to produce or consume a givenEventrequired too much implied context, and was error prone. - The API was not "static" enough: Because a given
Eventtype could be used by and produced for any context, we had to provide access to every possible API for every event type. This made the APIs easy to misuse. It should not be possible to trigger an "entity event" without an entity! - The API did too much work: Because events could be produced and used in any context, this meant that they all branched through code for every possible context. This incurred unnecessary overhead. It also resulted in lots of unnecessary codegen!
In Bevy 0.17 we have sorted out these issues without fundamentally changing the shape of the API. Migrations should generally be very straightforward.
The Rearchitecture #
The Event trait has been reframed / refocused to increase flexibility, make the API more static, and remove specialized cruft:
// Old: Bevy 0.16
// New: Bevy 0.17
Every Event now has an associated Trigger implementation. The Trigger trait defines the behavior of world.trigger() for that event. Trigger defines which observers will run, the order they will run in, and the data that is passed to them.
By representing this in the type system, we can constrain behaviors and data to specific types of events statically, making it impossible to "misuse" an Event. All of Bevy's existing "flavors" of events have been ported to the new Event / Trigger system.
The Event trait #
At a glance, the default Event derive and usage hasn't changed much. Just some shorter / clearer naming. The old API looked like this:
world.add_observer;
world.trigger;
In Bevy 0.17, defining observers has only changed slightly:
world.add_observer;
Trigger is now On. On encourages developers to think of this parameter as the event itself. This is also reflected in the new naming convention, where we name the variable after the Event (ex: game_over) rather than the Trigger (ex: trigger).
Internally things are a bit different though! The Event derive defaults to being "untargeted" / "global", by setting the Event::Trigger to GlobalTrigger. When it is triggered, only "untargeted" top-level observers will run, and there is no way to trigger it in a different context (ex: events with a GlobalTrigger cannot target entities!).
The EntityEvent trait #
In previous versions of Bevy, any event could optionally be triggered for an entity. It looked like this:
;
world.trigger_targets;
In Bevy 0.17, if you want an Event to target an Entity (and thus trigger any observers watching for that specific entity), you derive EntityEvent:
world.trigger;
Notice that Click now has the target entity as a field on the Event, and it now uses the same world.trigger() API that other events use. world.trigger_targets is no more ... every event is triggered using the same API!
// This observer will run for _all_ Click events targeting any entity
world.add_observer;
/// This observer will only run for Click events triggered for `some_entity`
world.entity_mut.observe;
An EntityEvent is an Event with an EntityTrigger, which will trigger entity-specific observers in addition to any global observers.
Deriving EntityEvent will set EntityEvent::event_target to a field named entity by default. In some cases (such as events that have multiple entity fields), it might make sense to use a more descriptive name. You can set the target using the #[event_target] field attribute:
EntityEvent Propagation #
An EntityEvent does not "propagate" by default (and by default they now statically have no access to APIs that control propagation). Propagation can be enabled using the propagate attribute (which defaults to using the ChildOf relationship to "bubble events up the hierarchy"):
This will set the Event's Trigger to PropagateEntityTrigger.
This enables access to "propagation" functionality like this:
world.add_observer;
Bevy's Pointer events have always tracked the "original target" that an "entity event" was targeting. This was handy! We've enabled this functionality for every EntityEvent with PropagateEntityTrigger: simply call On::original_event_target.
Component Lifecycle Events #
In past releases, the observer API for lifecycle events looked like this:
app.add_observer;
We've ported these over to the new system, and renamed them to match our new naming scheme (ex: OnAdd is now Add). They look like this now:
app.add_observer;
Component lifecycle events are an EntityEvent (and thus store the target entity as a field). They use the EntityComponentsTrigger, which allows them to be triggered for specific components on an entity. Thanks to the new Trigger system, this is also more efficient, as we can pass large / allocated context in instead of cloning it for each execution!
Custom Event Triggers #
The new Trigger trait also enables developers to implement their own specialized Event Trigger logic.
The Event derive can specify a custom Trigger like this:
This is generally unnecessary though ... Bevy's built-in default triggers are almost always what you want.
Events vs Messages #
In previous versions of Bevy, the Event trait was used for both "observable events" (handled with Observer) and "buffered events" (handled with EventReader). This made some sense, as both concepts could be considered "events" in their own right. But they are also fundamentally very different things functionally (see this PR description for full rationale).
In Bevy 0.17, Event is now exclusively the name/trait for the concept of something that is "triggered" and "observed". Message is the name / trait for something that is "buffered": it is "written" via a MessageWriter and "read" via a MessageReader.
It is still possible to support both contexts by implementing both traits, but we expect that to be significantly less common than just choosing one.
Bevy Feathers: Widgets for Tooling (Experimental) #
To make it easier for Bevy engine developers and third-party tool creators to make comfortable, visually cohesive tooling, we're pleased to introduce "Feathers" - a comprehensive Bevy UI widget set. Feathers is meant to be Bevy's "developer tools" widget set, and it will be used to build the upcoming Bevy Editor. It has a utilitarian look and feel, with an opinionated feature-set tailored for editors and graphical utilities. It builds on top of Bevy's new general-purpose "headless" widget set: bevy_ui_widgets (covered below). Feathers can be used in games, but that is not its motivating use case.
Feathers currently offers:
- Standard widgets designed to match the look and feel of the planned Bevy Editor.
- Components that can be leveraged to build custom editors, inspectors, and utility interfaces that feel consistent with other Bevy tooling.
- Essential UI elements including buttons, sliders, checkboxes, menu buttons, and more.
- Layout containers for organizing and structuring UI elements.
- Initial (simple / primitive) theme support to ensure consistent, configurable visual styling across applications. This is not the "final" Bevy UI theme system, but it provides some baseline functionality.
- Accessibility features with built-in screen reader and assistive technology support.
- Interactive cursor behavior that changes appropriately when hovering over widgets.
- A virtual keyboard suitable for touchscreen text input.
Feathers is still early in development. It is currently hidden behind the experimental_bevy_feathers feature flag. Feathers is still incomplete and likely to change in a variety of ways:
- We will port Feathers to BSN (Bevy's Next-Generation Scene/UI System) when that lands (targeted for Bevy 0.18).
- The
observeAPI is temporary: we hope to replace these with a general-purpose, relations-backed solution. - We are still working on polishing up some UX issues.
- There are missing widgets and features. Notably the "text input" widget is still being developed.
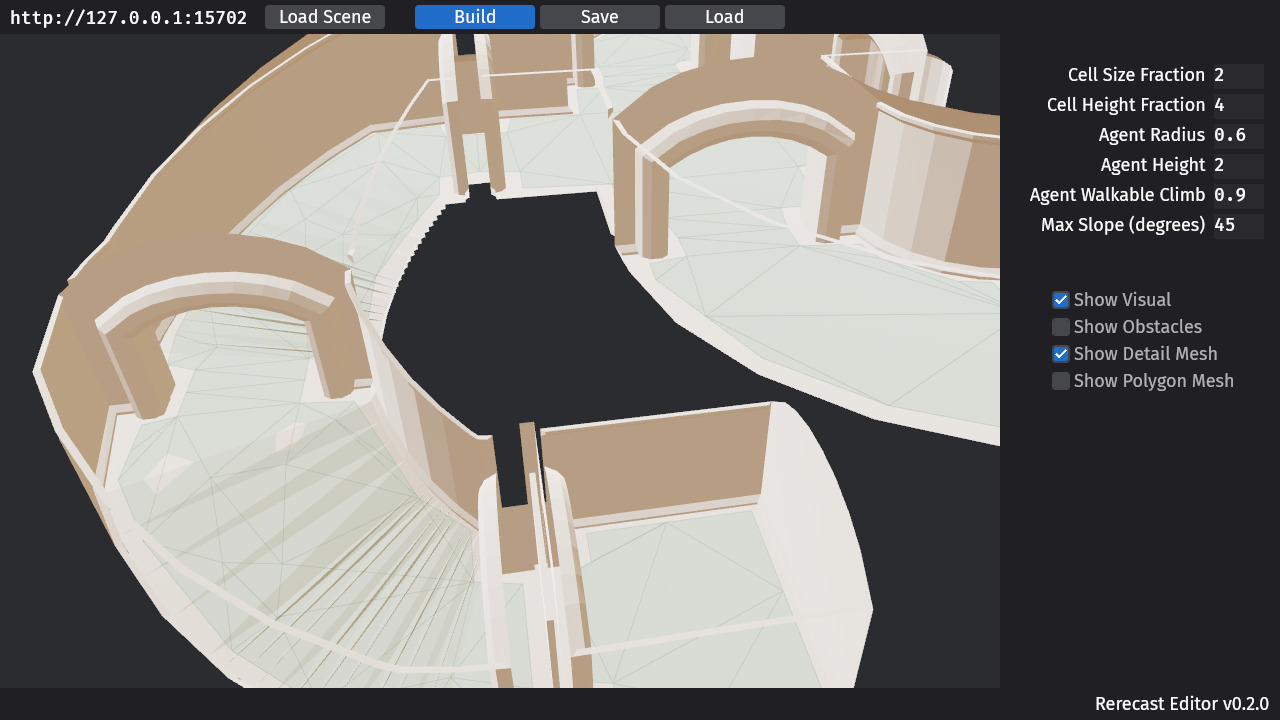
If you're looking to experiment with building tooling for Bevy, enable it and take feathers for a test flight! Let us know what problems you run into, and feel free to contribute missing widgets and bugs upstream. Some folks have already started building tooling on it, such as the Rerecast Editor (a navmesh editor):
If you can't wait to get your hands on bevy_ui widgets for your game, we recommend copying the Feathers code into your project and start hacking away at it! Feathers can serve as a helpful base to understand how to build and theme widgets in Bevy UI. It also illustrates how to use our new "headless" widget set: bevy_ui_widgets.
Realtime-Filtered Environment Maps #

An environment map needs to be processed to be able to support uses beyond a simple skybox, such as reflections at different roughness levels, and ambient light contribution. This process is called filtering, and can either be done ahead of time (prefiltering), or in realtime, although at a reduced quality.
Bevy already supported prefiltering, but its not always possible to prefilter: sometimes, your environment map is not available until runtime. Typically this is from realtime reflection probes, but you might also, for example, be using a procedural skybox.
Now, Bevy supports both modes of filtering! Adding a GeneratedEnvironmentMapLight to a Camera entity lets you use any environment map with Bevy's renderer, and enjoy all the benefits of prefiltering with none of the asset processing.
We've made sure it works with our built-in atmosphere shader too. To enable this, add the new component AtmosphereEnvironmentMapLight to the camera entity.
This is a fully dynamic per-view effect: no pre-baked environment maps are needed. However, please be aware that light probes are not yet supported.
Headless Bevy UI Widgets (Experimental) #
Bevy's Button and Interaction components have been around for a long time. Unfortunately these components have a number of shortcomings, such as the fact that they don't use the new bevy_picking framework, or the fact that they are really only useful for creating buttons and not other kinds of widgets like sliders.
In the web development world, "headless" widget libraries, such as headlessui and reakit have become popular. These provide unstyled standardized widgets that implement all of the correct interactions and behavioral logic: events, state management, accessibility, etc. The headless widgets provide the core behaviors, and it's the responsibility of the game developer to provide the visual style and animation for the widgets, which can fit the overall style of their game.
Bevy 0.17, introduces a collection of headless widgets. These are components which can be added to any UI Node to get widget-like behavior. The standard widget set includes:
Button: Emits an activation event when clicked.Slider: Lets you edit anf32value in a given range.Scrollbar: Lets you scroll through the contents of a UI node.Checkbox: Provides toggle-able state.RadioButtonandRadioGroup: Select an item from a set of items.
Here's a heavily styled example showing what is possible with them:
While these widgets are usable today for games and apps, they are still experimental. We are still polishing up some aspects of the developer experience and filling in gaps. Expect breaking changes as we continue to iterate and improve on them!
We're as excited as you are for first-party widgets. We've decided to ship these now so people can try them out: your feedback is vital!
If you would like to try out our experimental headless widgets, enable the experimental_bevy_ui_widgets feature.
Widget Interaction Components #
The standard widgets use additional components to drive behaviors:
InteractionDisabled: A boolean component used to indicate that a component should be "grayed out" and non-interactive.Hovered: A simple boolean component that allows detection of whether the widget is being hovered.Checked: A boolean component that stores the checked state of a checkbox or radio button.Pressed: A boolean component used by button-like widgets. Will be true while the button is held down.
These "boolean components" can be tracked using Bevy's built-in component change detection.
Widget Events #
The headless widgets use Bevy's event / observer system, just like any other components!
Activate: an event triggered whenever a widget is activated (ex: button pressed, radio button selected, etc).ValueChange: an event triggered whenever a value is changed (ex: slider changed, checkbox checked, etc)
These events can be handled using observers:
commands.spawn;
Light Textures #
The new components PointLightTexture, SpotLightTexture, and DirectionalLightTexture allow specifying light textures for lights, also commonly known as "light cookies". These modulate the intensity of light cast upon surfaces for various artistic effects. See the light_textures example for usage.
Hot Patching Systems in a Running App #
Bevy now supports hot patching systems via subsecond and the dx command line tool from the Dioxus project.
When the cargo feature hotpatching is enabled, every system can now be modified during execution, and the changes are immediately visible in your game.
dx is the Dioxus CLI. To install it run cargo install dioxus-cli@0.7.0-rc.0 --locked
Then run BEVY_ASSET_ROOT="." dx serve --hot-patch --features "bevy/hotpatching" to test it in your project. You can also try it out using Bevy's hotpatching_systems.rs example.
This is just the first step. There are known limitations:
- Only works on the binary crate. Dioxus has plans to expand support here.
- Not supported in Wasm. Dioxus supports this, but the Bevy side needs some work.
- If the system's parameters change, it will not be hot reloaded. This is something we need to work out on the Bevy side.
- It may be sensitive to rust/linker configuration. Dioxus is already pretty good about this though!
We have plans to further expand support, including making the upcoming bsn! macro hot-reloadable (check out this video of it in action!).
Deep Learning Super Sampling (DLSS) #
Drag this image to compare


For users with NVIDIA RTX GPUs, Bevy now offers yet another form of anti-aliasing: DLSS.
Try it out by running Bevy's anti_aliasing example: cargo run --example anti_aliasing --features dlss --release (after performing setup from https://github.com/bevyengine/dlss_wgpu).
Additionally, we've open sourced https://github.com/bevyengine/dlss_wgpu as a standalone crate to help other wgpu-based renderers integrate DLSS.
Compared to Bevy's built-in TAA, DLSS:
- Produces higher quality and more stable images
- Supports upscaling in addition to anti-aliasing, leading to much cheaper render times, particularly when used with GPU-heavy features like Bevy Solari
- Requires a NVIDIA RTX GPU
- Currently requires running via the Vulkan backend on Windows/Linux (no DirectX, macOS, web, or mobile support)
Note that DLSS integration is expected to have some bugs in this release related to certain rendering effects not respecting upscaling settings, and possible issues with transparencies or camera exposure. Please report any bugs encountered.
Other temporal upscalers like AMD's FidelityFX™ Super Resolution (FSR), Intel's Xe Super Sampling XeSS (XeSS), and Apple's MTLFXTemporalScaler are not integrated in this release. However they all use similar APIs, and would not be a challenge to integrate in future releases.
Support for other swapchain-related features like frame interpolation/extrapolation, latency reduction, or dynamic resolution scaling is not currently planned.
Special thanks to @cwfitzgerald for helping with the wgpu backend interop APIs.
Tilemap Chunk Rendering #
A performant way to render tilemap chunks has been added as the first building block for Bevy's tilemap support (more to come in future releases!). You can render a chunk by supplying a tileset texture to the TilemapChunk component and tile data to TilemapChunkTileData. For each tile, TileData allows you to specify the index into the tileset, the visibility, and the color tint.
let chunk_size = new;
commands.spawn;
ViewportNode #
Bevy UI now has a ViewportNode component, which lets you render camera output directly to a UI node:
commands.spawn;
The referenced camera here does require its target to be a RenderTarget::Image. See the new viewport_node example for more usage details.
Furthermore, if the bevy_ui_picking_backend feature is enabled, you can "pick" using the rendered target. That is, you can use any picking backend through the viewport node.
Raymarched Atmosphere / Space Views #
Bevy's procedural atmosphere now supports a raymarched rendering path that unlocks accurate views from above the atmosphere. This means Bevy 0.17 now has two atmosphere rendering modes to choose from:
AtmosphereMode::Raymarched- Ideal for cinematic shots, planets seen from space, and "flight simulator" type scenes
- More accurate lighting, but slower
- Sharper shadows through the atmosphere
AtmosphereMode::LookupTexture- This is the default
- Great for ground level and broad outdoor scenes
- Less accurate lighting at long distances, but faster
- Softer shadows through the atmosphere
To use it, add an Atmosphere component to your Camera and set the rendering method on the camera’s AtmosphereSettings:
commands.spawn;
You can also adjust the AtmosphereSettings::sky_max_samples to configure the maximum number of steps to take when raymarching the atmosphere. Lower numbers are faster and less accurate. Higher numbers are slower and more accurate.
See the updated atmosphere example for a working reference.
Procedural Sun Disk #
Any good procedural atmosphere deserves a procedural sun to light it. To enable this, add the SunDisk component to your DirectionalLight entity. The sun will move with your light, playing nicely with any positioning or movement logic you've implemented.
You can set both the angular_size and intensity of the sun disk, changing the size and brightness of the sun. We've included a convenient SunDisk::EARTH constant, to spare you the tricky experimental trigonometry.
If you've ever stared directly at the sun in real life (not recommended), you'll also be familiar with a spreading glow that bleeds out into the nearby sky. This is an effect known as "bloom", which is enabled by adding the Bloom component to your camera entity.
Web Assets #
Bevy now supports downloading assets from the web over http and https. Use the new http and https features to enable http:// and https:// URLs as asset paths. This functionality is powered by the ureq crate on native platforms and the fetch API on wasm.
let image = asset_server.load;
commands.spawn;
Security note: if using web assets, be careful about where your URLs are coming from! If you allow arbitrary URLs to enter the asset server, it can potentially be exploited by an attacker to trigger vulnerabilities in our asset loaders, or DOS by downloading enormous files. We are not aware of any such vulnerabilities at the moment, just be careful!
By default these assets aren’t saved anywhere but you can enable the web_asset_cache feature to cache assets on your file system.
The implementation has changed quite a bit but this feature originally started out as an upstreaming of the bevy_web_asset crate. Special thanks to @johanhelsing and bevy_web_asset's contributors!
Reflect Auto Registration #
Deriving Reflect on types opts into Bevy's runtime reflection infrastructure, which is used to power systems like runtime component inspection and serialization:
In previous Bevy versions, any top-level types that derived Reflect had to be manually registered using register_type:
// This would make Foo visible to Bevy
app.
In Bevy 0.17, all types that #[derive(Reflect)] are now automatically registered! This significantly reduces the boilerplate required to use Bevy's reflection features, which will be increasingly important as we build out Bevy's new scene system, entity inspector, and visual editor.
Note that generic types still require manual registration, as these types don't (yet) exist when Reflect is derived:
app.
In cases where automatic registration is undesirable, it can be opted-out of by adding the #[reflect(no_auto_register)] attribute to the type.
Supporting Unsupported Platforms #
This feature relies on the inventory crate to collect all type registrations at compile-time. This is supported on Bevy's most popular platforms: Windows, macOS, Linux, iOS, Android, and WebAssembly. However, some niche platforms are not supported by inventory, and while it would be best for any unsupported platforms to be supported upstream, sometimes it might not be possible. For this reason, there is a different implementation of this feature that works on all platforms.
Virtual Geometry BVH culling #
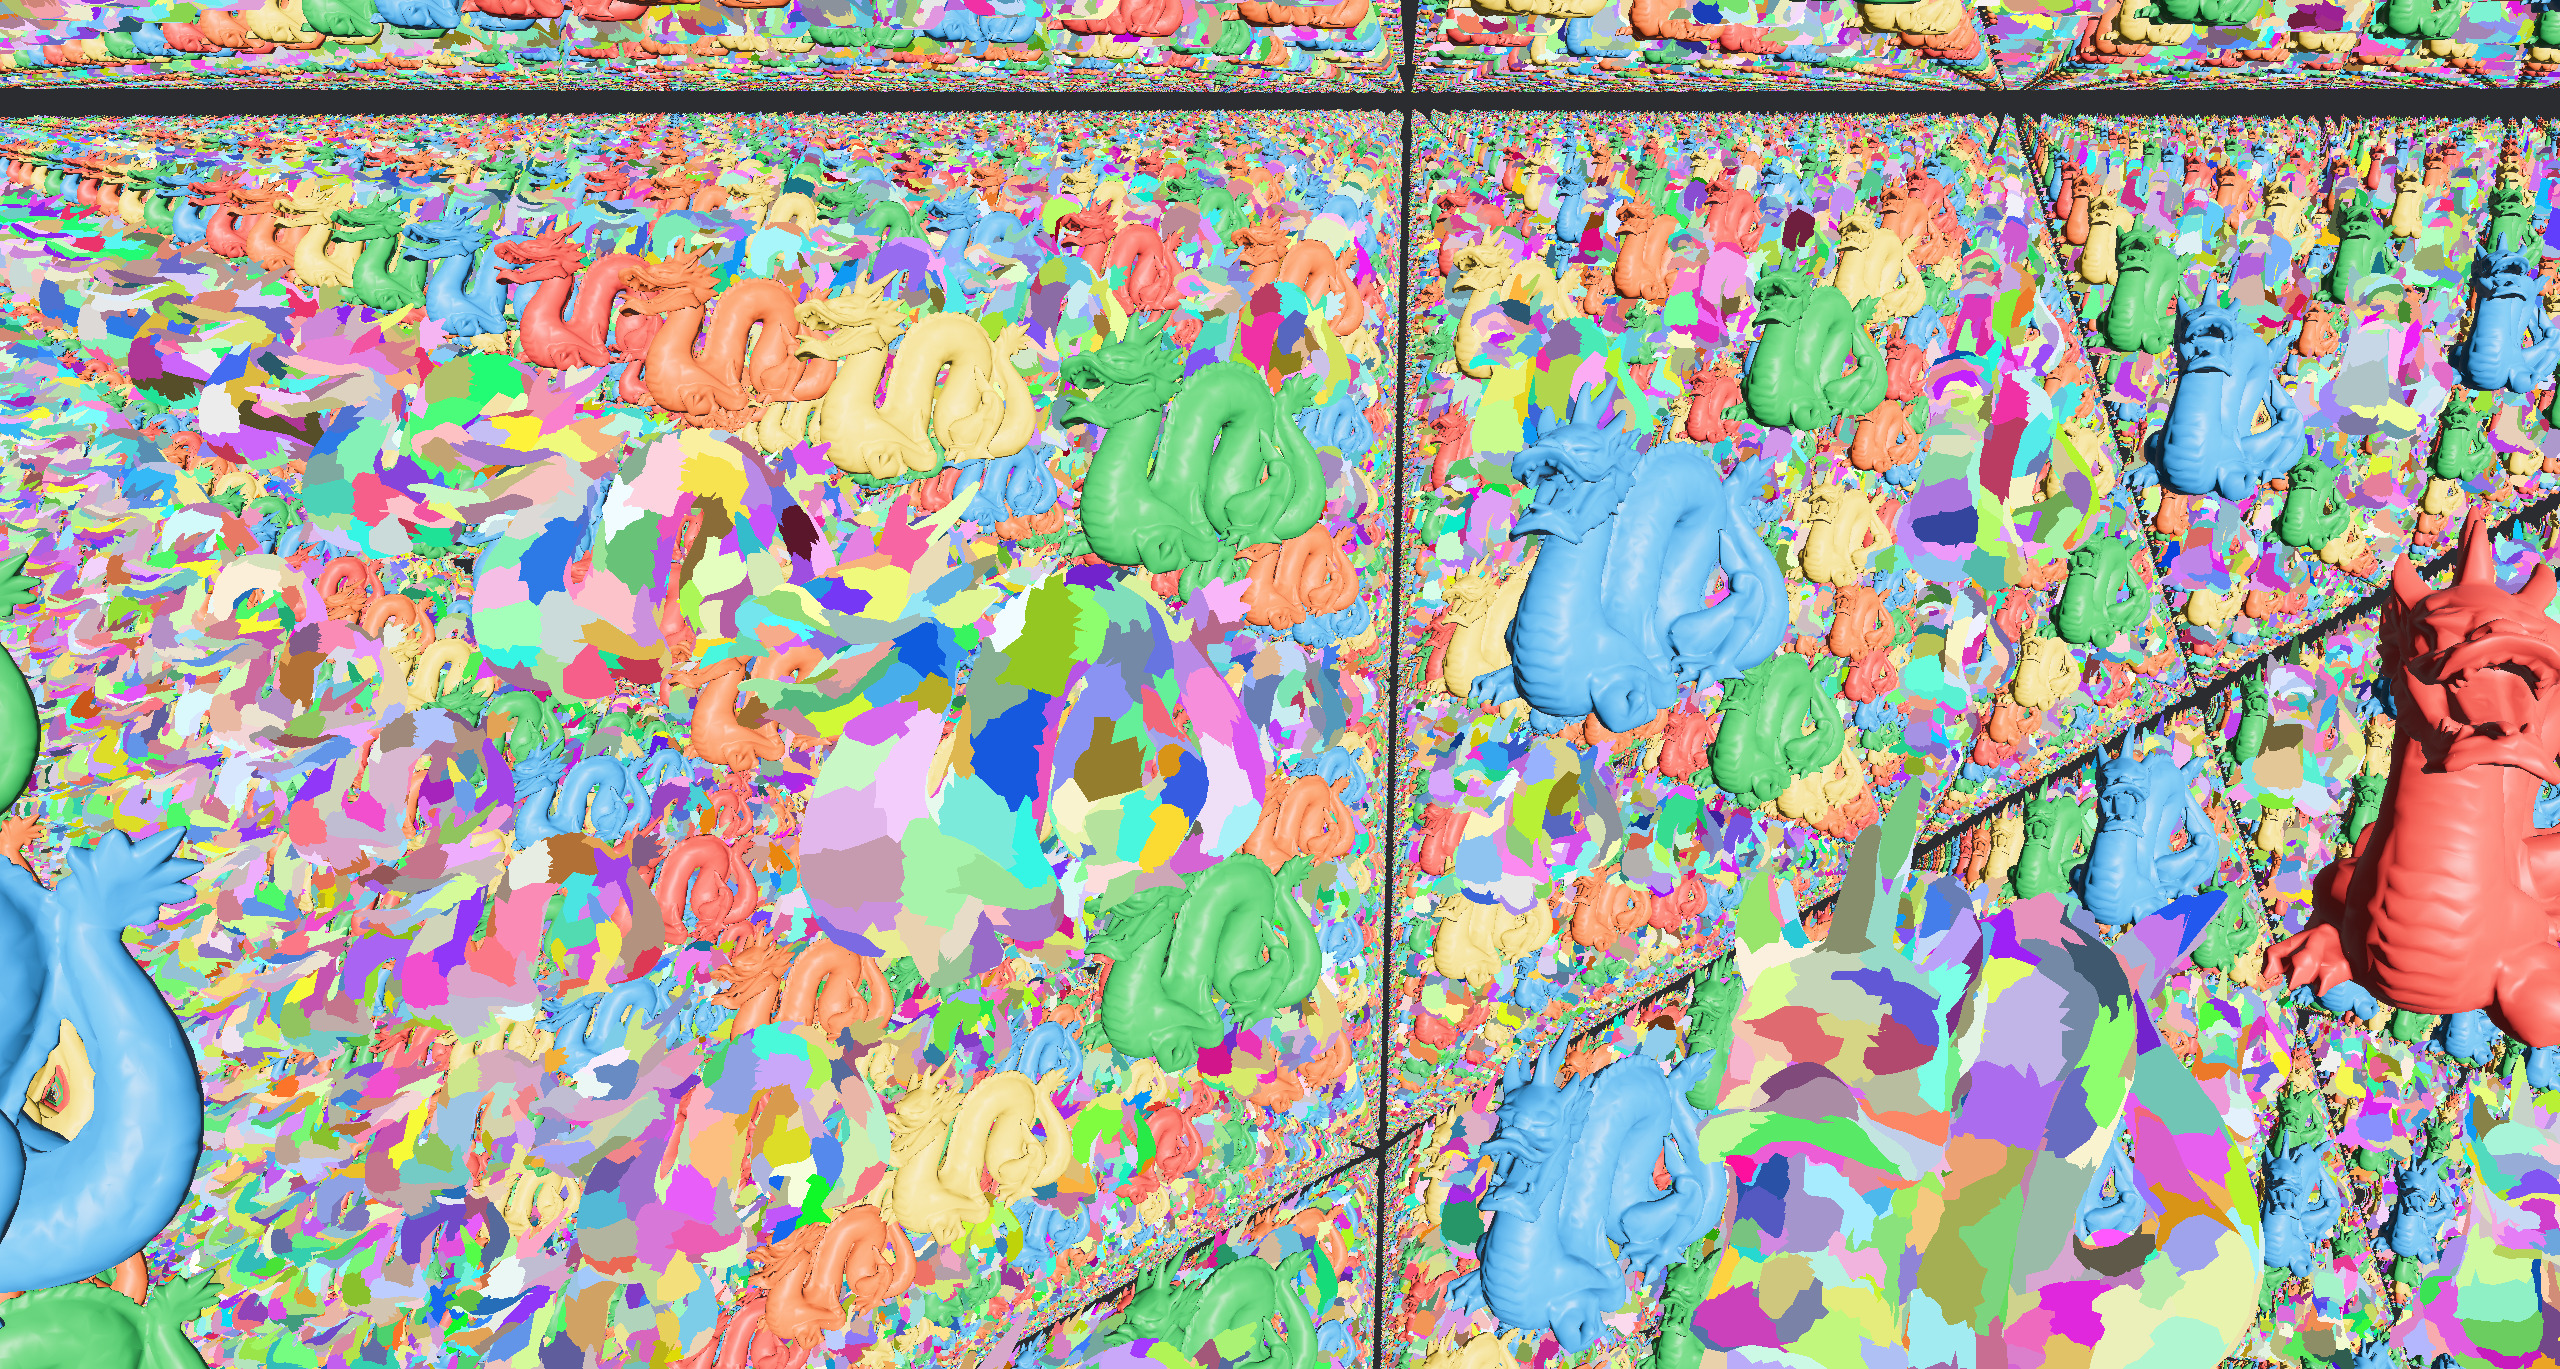
Bevy's virtual geometry has been greatly optimized with BVH-based culling, making the cost of rendering nearly independent of scene geometry.
These changes have also lifted the previous cluster limit that limited the world to 2^24 clusters (about 4 billion triangles). There are now no hardcoded limits to scene size. In practice you will only be limited by asset VRAM usage (as asset streaming is not yet implemented), and total instance count (again, due to temporary limitations we're working on improving).
The screenshot above has 130,000 dragons in the scene, each with about 870,000 triangles, leading to over 115 billion total triangles in the scene.
Speaking of concrete GPU cost, the scene above renders in about 3.5 ms on the 4070, with ~3.1 ms being spent on the geometry render and ~0.4 ms on the material evaluation. After increasing the instance count to over 1 million (almost 900 billion triangles!), the total increases to about 4.5 ms, with ~4.1 ms on geometry render and material evaluation remaining constant at ~0.4 ms. This is a 30% increase in GPU time for an almost 8x increase in scene complexity.
Comparing GPU times to Bevy 0.16 on a much smaller scene with 1,300 instances, previously the full render took 2.2 ms, whereas now in Bevy 0.17 it takes 1.3 ms.
Frame Time Graph #
When measuring a game's performance, just seeing a number is often not enough. Seeing a graph that shows the history makes it easier to reason about performance. Bevy 0.17 introduces a new visual "frame time graph" to solve this problem!
To display the frame time graph, enable the bevy_dev_tools cargo feature and add in FpsOverlayPlugin:
This displays "frame time" not "frames per second", so a longer frame time results in a bigger and wider bar. The color also scales with that frame time. Red is at or bellow the minimum target fps and green is at or above the target maximum frame rate. Anything between those 2 values will be interpolated between green and red based on the frame time.
The algorithm is highly inspired by Adam Sawicki's article on visualizing frame times.
Text2d Drop Shadows #

Text2d is a simple worldspace text API: great for damage numbers and simple labels. Unlike Text, its UI sibling, it didn't support drop shadows, so in Bevy 0.17 we've added dropshadow support to Text2d. Add the Text2dShadow component to a Text2d entity to draw a shadow effect beneath its text.
Text Background Colors #

Text in Bevy now supports background colors. Insert the TextBackgroundColor component on a UI Text or TextSpan entity to set a background color for its text section. TextBackgroundColor provides the ability to set the color of each "text span", whereas the standard BackgroundColor applies to all spans in a Text node, and also includes space taken up by padding.
TextBackgroundColor also works with Text2d: perfect for worldspace tooltips!
UI Gradients #
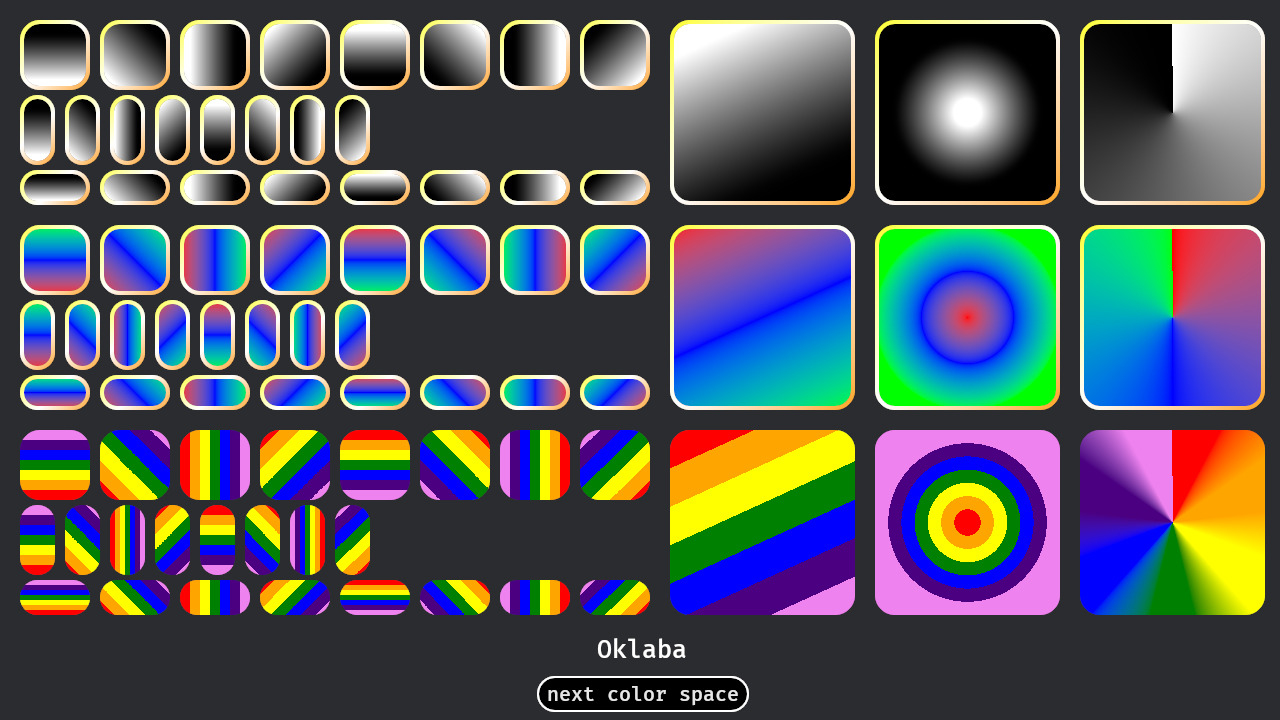
Bevy now supports UI nodes that display a gradient that transitions smoothly between two or more colors.
You can now add the BackgroundGradient component to a Node to set its background to a gradient. If you also set a BackgroundColor, the background color is drawn first and the gradient(s) are drawn on top. You can also use the BorderGradient component to make the border use a gradient.
Both of these components wrap the Gradient enum type, which has three variants:Linear, Conic and Radial.
Each gradient type consists of the geometric properties for that gradient, a list of color stops, and the color space used for interpolation (Bevy defaults to using InterpolationColorSpace::Oklab).
commands.spawn
Per-side UI Border Colors #
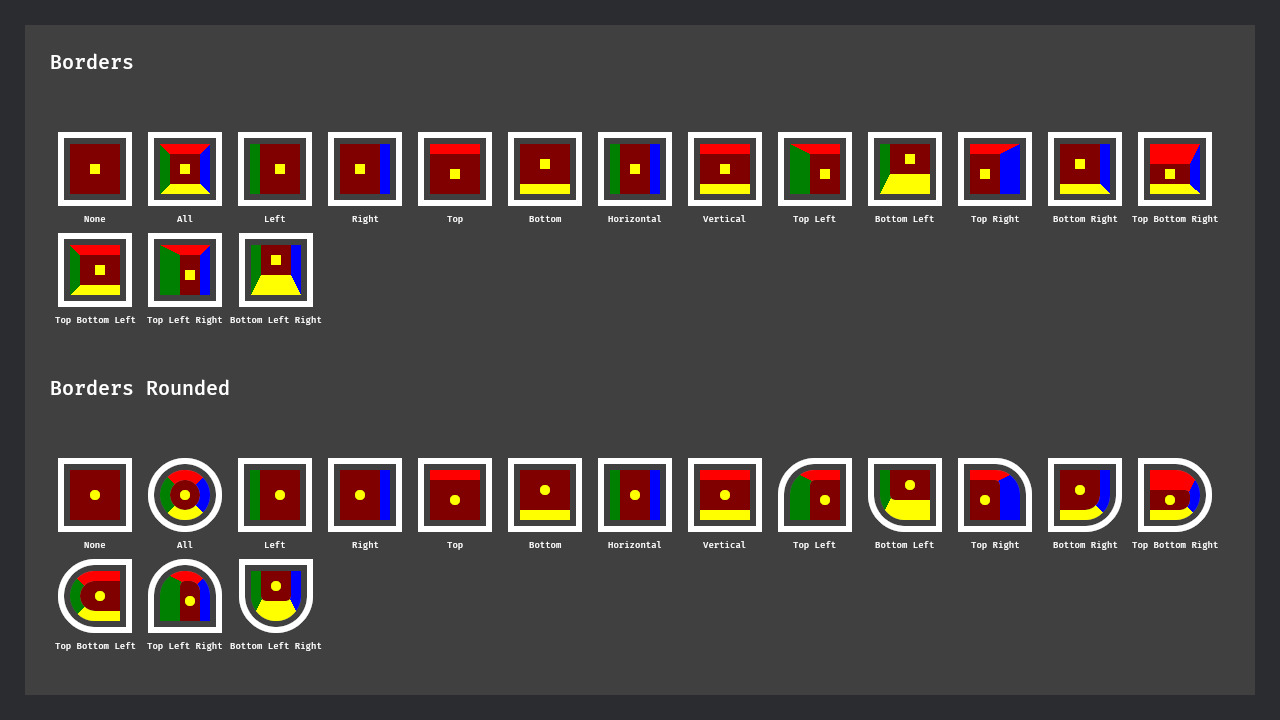
bevy_ui now supports distinct border colors on each side of your UI nodes, controlled with the BorderColor component. This feature was borrowed from CSS, where it is commonly used to fake buttons with depth, but we're looking forward to seeing your creative designs.
Specialized UI Transform #
In Bevy UI, Transform and GlobalTransform have been replaced by UiTransform and UiGlobalTransform. UiTransform is a specialized 2D UI transform, which more effectively maps to the UI space, improves our internals substantially, and cuts out redundant, unnecessary, often expensive work (such as doing full hierarchical Transform propagation in addition to the Bevy UI layout algorithm).
Data-Driven Materials #
Bevy's material system has historically relied on the Material and AsBindGroup traits in order to provide a type-safe way to define data that is passed to the shader that renders your material. While this approach has many advantages, recent improvements to the renderer, like GPU-driven rendering in Bevy 0.16, have made the 3D renderer more siloed and less modular than we would like. Additionally, the type-level split between Material and Material2d has meant that every feature implemented for 3D needs a mostly copy-pasted version for 2D, which has caused the 2D renderer to lag behind in terms of features.
In Bevy 0.17, we've started the process of refactoring the renderer's mid and low-level APIs to be data driven. More specifically, we've removed the M: Material bound from every rendering system in the render world. Rather than being described statically by a type, the renderer now understands materials in terms of plain data that can be modified at runtime. Consequently, it is now possible to implement a custom material that doesn't rely on the Material trait at all, for example in the new manual material example. While this API isn't exactly ergonomic yet, it represents a first step in decoupling the renderer from a specific high-level material API.
Importantly, for users of the Material trait, nothing changes. Our AsBindGroup driven API is now just one possible consumer of the renderer. But adopting a more dynamic, data-first approach creates many opportunities for the renderer we are hoping to explore in 0.18 and beyond, including:
- Unifying the 2D and 3D rendering implementations. While we'll continue to present an opinionated 2D API that benefits users building 2D games, we want every new rendering improvement to the 3D renderer to be at least potentially available to 2D users.
- Exploring new material representations for a future material editor. While type-safety is great for writing code, it poses real problems for being able to dynamically edit a material in a UI like a shader graph or load a material at runtime from a serialized format.
- Modularizing more of the mid-level rendering APIs to allow user's writing advanced rendering code access to complicated pieces of rendering infrastructure like mesh and bind group allocation, GPU pre-processing, retained rendering caches, and custom draw functions.
With this foundation in place, we're actively evolving the renderer to embrace the flexibility and composability that defines Bevy's ECS. If you'd like to help us explore the possibilities of ECS-driven rendering, please join us on Discord or GitHub Discussions!
Entity Spawn Ticks #
In previous versions of Bevy, keeping track of which entities have been spawned since the last time a system ran could only be done indirectly by writing your own logic.
The new SpawnDetails query data and Spawned query filter enable you to find recently spawned entities without any marker components.
SpawnDetails #
Use this in your query when you want to get information about the entity's spawn:
Spawned #
Use this filter in your query if you are only interested in entities that were spawned after the last time your system ran:
Note that, much like Added and Changed filters, this is a "non archetypal filter", meaning it requires scanning every entity matching the query, including those that weren't spawned since the last run. Because of this, the system above performs roughly the same as this one:
Getter methods #
You can also use helper methods on EntityWorldMut and EntityCommands:
world.entity.spawn_tick
ButtonInput for Key #
Bevy now has a ButtonInput<Key> resource, similarly to the existing ButtonInput<KeyCode> resource.
The difference between KeyCode and Key is that the former refers to the button location on a US keyboard independent of the actual layout in use, while Key gives you the actual letter or symbol that was entered. In most cases you still want to use KeyCode, but in some cases it makes more sense to use Key, for example when using '+'/'-' to zoom.
Val helper functions #
To make Vals easier to construct the following helper functions have been added: px, percent, vw, vh, vmin and vmax:
// Using Val::Px directly:
Node
// Using the px() helper:
Node
Each function takes any integer type and returns the value wrapped by its corresponding Val variant. There is also an auto helper function that maps to Val::Auto.
Also included with this release is a fluent interface for constructing UiRects from Vals:
Node
The available functions are left, right, top, bottom, all, horizontal and vertical. Each function calls the corresponding UiRect constructor on self, i.e. fn left(self) -> UiRect { UiRect::left(self) }.
glTF Forward Semantics Configuration #
CAUTION: This is an experimental feature with known issues. Behavior may change in future versions.
Bevy uses the following coordinate system for all worldspace entities that have a Transform:
- forward: -Z
- up: Y
- right: X
But glTF is a bit more complicated. Models in glTF scenes use the following coordinate system:
- forward: Z
- up: Y
- right: -X
but cameras and lights in glTF scenes use the following coordinate system:
- forward: -Z
- up: Y
- right: X
As you can see, this clashes with Bevy assumption that everything in the world uses the same coordinate system. In the past, we only imported glTFs using the camera / light coordinate system for everything, as that is already aligned with Bevy. In other words, the glTF importer simply assumed that glTF models used -Z as their forward direction, even though they use +Z.
But that meant that on the Bevy side, a glTF model's Transform::forward() would actually point backwards from the point of view of the model, which is counterintuitive and very annoying when working across different art pipelines.
To remedy this, users can now change the import behavior to instead favor correct Transform::forward() semantics for models. The downside is that glTF cameras and lights that have a global identity transform in glTF will now look to +Z instead of -Z in Bevy. This should not be a problem in many cases, as the whole scene is rotated so that the end result on your screen will be rendered the exact same way.
To globally opt into the behavior that favors glTF models over glTF cameras, you can set GltfPlugin::use_model_forward_direction:
new
.add_plugins
.run;
You can also control this on a per-asset-level:
let handle = asset_server.load_with_settings;
Setting the above to None will fall back to the global setting taken from GltfPlugin::use_model_forward_direction.
RenderStartup Schedule #
In previous versions of Bevy, render Plugin code had to look different than other Plugin code, due to how the renderer was initialized. In general, renderer resources and systems had to be added in Plugin::finish, separate from the typical spot: Plugin::build. The fact that Plugin::finish resulted in the correct order was a bit arbitrary / incidental.
As a step towards solving this, Bevy 0.17 introduces the RenderStartup schedule and ports many renderer resources to be initialized in RenderStartup with systems. This makes renderer initialization more structured and allows renderer plugin initialization to be defined "normally" in Plugin::build. It also allows renderer init code to benefit from the Bevy ECS scheduler, including automatic parallelization and system ordering.
In previous versions, initializing a renderer resource looked like this:
;
In Bevy 0.17, it can now be written like this:
;
We highly encourage renderer developers to port their own rendering resources to this new approach!
Component Propagation #
When working with large hierarchies of game objects, coordinating the state of the entire tree can be frustrating. Bevy uses this pattern when working with transforms and visibility internally, but users have had to reinvent the wheel every time they wanted to use similar patterns.
While this pain was most acute when working with RenderLayers, this pattern is more broadly useful, and has been exposed to end users in the form of the HierarchyPropagatePlugin. Some example use cases:
- Synchronizing color and alpha values for "ghost" versions of previewed buildings
- Ensuring that all of the parts of a model are on the same render layer
- Propagating font styles
This plugin has three generics:
C: Component: the type of component that should be propagatedF: QueryFilter=(): if set, only entities which match this filter will be affected by propagationR: Relationship = ChildOf: the type of tree-like relationship to propagate down
Each copy of this plugin will propagate components of type C down the hierarchy, along all entities which match the query filter of type F. With this plugin enabled for C, you can add a Propagate<C> component to add new components to all children, add a PropagateStop<C> component to stop propagation, or even use PropagateOver<C> to skip this entity during propagation.
This is a very general tool: please let us know what you're using it for and we can continue to add examples to the docs!
Infinite Children #
The children! macro is a convenient way to spawn children alongside their parents in Bevy code. When it was introduced in Bevy 0.16 this was limited to 12 children, due to arbitrary limitations (Rust: please support variadic generics!), and not implementing the requisite workarounds. When working with large UI hierarchies, this could be a real nuisance, forcing users to resort to ugly workarounds.
We've rewritten the macro and lifted this unjust restriction. You are now only limited by Rust's recursion limit: around 1400 children at once. Rejoice! If you are manually spawning more than 1400 children in a single macro call, you should reconsider your strategy (such as using SpawnIter or SpawnWith).
We've made the same change to the related! macro, allowing you to spawn huge numbers of related entities in a single call.
Decoupling Bevy's Public API from Bevy Render #
In Bevy 0.17 we have decoupled most of the user-facing renderer API from bevy_render (Bevy's default built-in renderer, which uses wgpu). It is now possible to use cameras, lights, shaders, images, meshes, sprites, text, ui, picking, animation, and scenes without depending on bevy_render.
With these changes, it is now possible for 3rd party custom renderers to act as drop-in replacements for rendering Bevy scenes, without the need to pull in bevy_render.
This is also incredibly important for reducing compile time, especially for 3rd party crates: crate authors can now depend more granularly on the specific crates they need. If they don't need access to renderer internals, they don't need to wait for them to start compiling! This increases the potential for parallel compilation.
Additionally, "shader library only" crates with minimal dependencies are now possible thanks to the new separate bevy_shader crate.
Consistent Naming Conventions for System Sets #
Names of SystemSet types within Bevy and its ecosystem have historically been very inconsistent. Examples of system set names include AccessibilitySystem, PickSet, StateTransitionSteps, and Animation.
Naming conventions being so wildly inconsistent can make it harder for users to pick names for their own types, to search for system sets on docs.rs, or to even discern which types are system sets.
To reign in the inconsistency and help unify the ecosystem, Bevy 0.17 has renamed most of its own system sets to follow a consistent *Systems naming convention. As you can see by this very incomplete list of renames, our naming was all over the place:
GizmoRenderSystem→GizmoRenderSystemsPickSet→PickingSystemsAnimation→AnimationSystemsUpdate2dText→Text2dUpdateSystems
The Systems suffix was chosen over the other popular suffix Set, because Systems more clearly communicates that it is specifically a collection of systems, and it has a lower risk of naming conflicts with other set types.
For consistency, we recommend that ecosystem crates and users follow suit and also adopt the *Systems naming convention for their system sets where applicable.
What's Next? #
The features above may be great, but what else does Bevy have in flight? Peering deep into the mists of time (predictions are extra hard when your team is almost all volunteers!), we can see some exciting work taking shape:
- BSN: Bevy's Next Generation Scene / UI System: We currently have a working prototype for a much-improved unified Scene / UI system. We plan to land the new
bsn!macro and the.bsnasset format in Bevy 0.18. - Fully-Fledged UI Framework:
feathersis a great start, but it's just barely hatched. We're looking forward to improving ergonomics by porting it to BSN, adding more widgets, solidifying features like theming and screen reader support, and making it easier for you to build per-project design systems that allow you to create consistently styled, low-boilerplate UI. - First-Party Entity Inspector: Entity inspectors are an incredibly valuable debugging tool, both as an ad-hoc dev tool and as a key element of an editor. This will be built with
feathers, allowing us to refine both its aesthetic and functionality in preparation for more extensive developer tooling. firewheelAudio: Thefirewheelteam has been hard at work, creating a production-grade audio solution for Rust. We're encouraged by the draft integration viabevy_seedling, and keen to improve Bevy's first-party audio quality.- Improved Examples: We're looking to expand our Bevy usage examples to ensure more real-world scenarios are covered, and finally add production-grade assets to our examples to show off how Bevy looks when showcasing the work of talented artists.
Support Bevy #
Bevy will always be free and open-source, but it isn't free to make! Because Bevy is free, we rely on the generosity of the Bevy community to fund our efforts. If you are a happy user of Bevy or you believe in our mission, please consider donating to the Bevy Foundation... every bit helps!
Contributors #
A huge thanks to the 278 contributors that made this release (and associated docs) possible! In random order:
- @mate-h
- @Bluefinger
- @Threadzless
- @juxe
- @Vrixyz
- @mweatherley
- @Trashtalk217
- @AlephCubed
- @tmstorey
- @mamekoro
- @it-me-joda
- @kpreid
- @tomaspecl
- @Austreelis
- @SarthakSingh31
- @TheNeikos
- Threadzless
- @robtfm
- @cBournhonesque
- @cart
- @mrchantey
- @axlitEels
- @rlneumiller
- @adsick
- @HanKruiger
- @772
- @darthLeviN
- @dmyyy
- @re0312
- @nickyfahey
- @MushineLament
- @agluszak
- @ItsDoot
- @Testare
- @RabadanDotDev
- @Pnoenix
- @baozaolaoba-top
- @hymm
- @IQuick143
- @ElliottjPierce
- @kerstop
- @bjoernp116
- @jbuehler23
- @mbrea-c
- @NthTensor
- @angelthorns
- @Victoronz
- @Sigma-dev
- @zachbateman
- @joshua-holmes
- @jz009
- @NiklasEi
- @Azorlogh
- @Jondolf
- oscar-benderstone
- @stevehello166
- @DeveloperMindset123
- @jiangheng90
- @james7132
- @exoego
- @moonheart08
- @Lenchog
- @MrGVSV
- @BD103
- @coolcatcoder
- @rendaoer
- @ChristopherBiscardi
- @JMS55
- @mnmaita
- @mirsella
- @Noxmore
- @atlv24
- @urben1680
- @onbjerg
- @nekonimous
- @foxzool
- @Waridley
- @SOF3
- @nnethercote
- @dontgetfoundout
- @inodentry
- @mrtracy
- @theotherphil
- @jnhyatt
- @kyon4ik
- @damccull
- @lynn-lumen
- @jakobhellermann
- @k2d222
- @villor
- @emjomi
- @beholdnec
- @MarcGuiselin
- @extrawurst
- @ecoskey
- @Henauxg
- @madsmtm
- @Carter0
- @ivanstepanovftw
- @defuz
- @Jaso333
- @BenjaminBrienen
- @kirawulff
- @Freyja-moth
- @kumikaya
- @fredericvauchelles
- @BigWingBeat
- @Kees-van-Beilen
- @torsteingrindvik
- @taj-holliday
- @lcnr
- @Signez
- @shunkie
- @Shatur
- @lomirus
- @Leinnan
- @dubrowgn
- @jhgarner
- @tylercritchlow
- @UkoeHB
- @manokara
- @futile
- @rparrett
- @Sieluna
- @jf908
- @irh
- @HugoPeters1024
- @mcobzarenco
- @JeanMertz
- @HeartofPhos
- @shirokoff
- @greeble-dev
- @443eb9
- @Zeenobit
- @nukanoto
- @tjlaxs
- @janis-bhm
- @chescock
- @IceSentry
- @TheBlckbird
- @krunchington
- @ickshonpe
- @tigregalis
- @ReallyMadHermit
- @diyu-motif
- @NiseVoid
- @DGriffin91
- @inact1v1ty
- @insprac
- @Sorseg
- @RuelYasa
- @atlasgorn
- @kristoff3r
- @yonson2
- @oscar-bender-stone
- @AtheMathmo
- @Elabajaba
- @VitalyAnkh
- @oracle58
- @DaAlbrecht
- @Myxogastria0808
- @Lailatova
- @lewiszlw
- @TimJentzsch
- @onkoe
- austreelis
- @yrns
- @Person-93
- @chaosteil
- @ConnerPetzold
- @benfrankel
- @aloucks
- @SilentSpaceTraveller
- @CorvusPrudens
- @Mysvac
- @Wuketuke
- @chompaa
- @brookman
- @laundmo
- @rnazali
- @pcwalton
- @Joel-Singh
- @nezuo
- @superdump
- @GuillaumeGomez
- @dsgallups
- @tim-blackbird
- @mintlu8
- @andristarr
- @Shelim
- @alice-i-cecile
- @viridia
- @SpecificProtagonist
- @weihnaxbaum
- @gwafotapa
- @SaladinAyyub
- @andriyDev
- @Pascualex
- @chendaohan
- @fallible-algebra
- @afonsolage
- @KrzysztofZywiecki
- @aevyrie
- @Olle-Lukowski
- @databasedav
- @selvmaya
- @liamaharon
- @serialx
- @AlexAegis
- @mhsalem36
- @LikeLakers2
- @mockersf
- @tronical
- @Selene-Amanita
- @boondocklabs
- @chamaloriz
- @SteveAlexander
- @Wiwip
- @splo
- Krzysztof Zywiecki
- @maximemulder
- @shwwwa
- @HippoGamus
- @Zeophlite
- @jordanhalase
- @eckz
- @marlyx
- @akimakinai
- @tomara-x
- @amedoeyes
- @zacryol
- @Adriigbs
- @mgi388
- @colepoirier
- @NonbinaryCoder
- @sirius94
- @Fodesu
- @supdrewin
- @ZioKli
- @FlippinBerger
- @MiniaczQ
- @grind086
- @fairhill1
- @EmbersArc
- @tbillington
- @RosyArts
- @muddxyii
- @Bleachfuel
- @hukasu
- @jannik4
- @ariofrio
- @DataTriny
- @lkolbly
- @doup
- @JaySpruce
- @janhohenheim
- TM Storey
- @dloukadakis
- @tychedelia
- @Brezak
- @brianreavis
- @eero-lehtinen
- @istudyatuni
- @bushrat011899
- @mogambro
- @Breakdown-Dog
- @IRSMsoso
- @SparkyPotato
- @SkiFire13
- @Satellile
- @villuna
- @noahsabaj
- @MalekiRe
- @eugineerd
- @Cyberboss
- @Glory2Antares
- @komadori
- @zerocukor287
For those interested in a complete changelog, you can see the entire log (and linked pull requests) via the relevant commit history.